As I continue to play with the Hearty Country Bread recipe, I'm always trying new methods and additives. This time, I'm going to try letting it rise in the refrigerator for two nights, add the salt to the dough instead of at the same time as the sponge, and add in green onions.
Stacey's Green Onion Hearty Country Bread Ingredients:
Sponge
1c whole wheat flour, organic
1/2c dark rye flour, organic
1/2 tsp yeast
1c water, 110F
Dough
3c unbleached white bread flour, organic artisan + 1/2-1c additional
1 tsp yeast
2 tsp salt
1 1/3c warm water, 110F
3 tbs honey (avocado honey - it's dark, thick and not very sweet or strong tasting. The boyfriend found this at a Mediterranean market)
5 green onions
Sunflower oil, organic
Hardware
Standing Mixer
Silicone spatula
Silicone brush
Plastic wrap
Parchment paper
Baking stone
Rimless baking sheet
First I made the sponge (mix all the ingredients together and cover with plastic wrap) and let it sit overnight. The next morning, I made the dough. I put the flour, yeast, and salt into my standing mixer and mixed the honey into the warm water. With the dough hook on the mixer, and on the stir setting, I poured the honey water in and allowed the dough to form. It was a fairly wet dough, but I like this better because otherwise the sponge won't mix in correctly.
I let the dough rest for 20 minutes, covered, after it was combined, and chopped the green onions into small pieces, discarding the tops and the bottom root portion. After the 20 minutes of resting and then added in the sponge and the green onions. I turned the mixer on with the dough hook and let it mix for 8 minutes, adding additional flour until the dough was just dry enough not to stick to my silicone spatula. It was still sticky to the touch, but just not sticky enough to instantly bond to the spatula.
Once it was complete, I poured a little bit of the oil on the dough (probably a tablespoon) and used a silicone brush to brush oil around the surface of the dough and the sides of the bowl. Then I used the silicone spatula to sort of turn the dough so that it would be separated from the bowl and get some oil over all of the dough's surface. I think you're supposed to make it into a ball by hand, but I'm lazy. :) Then I covered the top of the bowl with plastic wrap, not touching the dough, and then put it in the fridge overnight.
The following evening, I took the dough out, separated it into two pieces and formed loaves. I always press the dough into a flat rectangle, fold into the center like a business letter, then fold the opposite ends in and smash the edges together with my fingers to fix the ends. Then I turn it upside down so that the entire surface is round and smooth. I placed them on the parchment paper on the rimless baking sheet, brushed them with oil with the silicone brush, and left them to rise overnight.
In the morning, I set the oven to 500F with my baking stone in it, and then went to check on my 2 loaves in the refrigerator.
Lesson Learned: You'd think I'd know this after putting two loaves too close together in the oven in my last post. No, I did not. I put both loaves next to each other. So, from now on, I'll only put 1/2 of this recipe on each baking sheet (unless I'm baking a single loaf, of course).

The other thing I learned recently is that you're supposed to score the loaves right before they go into the oven.

One more reason that you shouldn't put all the dough on is that this much dough is pretty tough to wiggle on to the baking stone, especially if it's been rising in the fridge all night on the parchment paper (which gets the parchment paper pretty damp). I just barely got it in there. I try not to let too much heat out of the oven and open it for as short a time as possible, so anything that lengthens the process of getting the dough onto the stone is not so great.
I baked the loaves for about 30 minutes and I wish I could add smell to my posts. I love the smell of bread and green onion, so together it was just heavenly.
These loaves were big, and I've learned with big loaves, it's best to use both hands with 2 oven mitts to get them out of the oven.
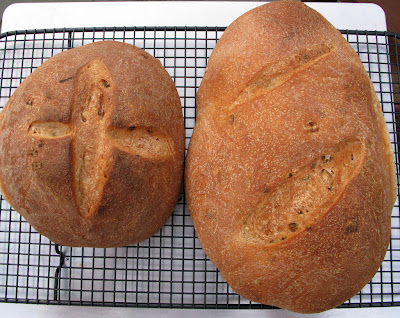
I let them cool for another 30 minutes before slicing. I really like the texture of this bread. I think letting them rise in the refrigerator over a period of two days was well worth it.

The air pockets were the right size and the center was soft, moist, and had nice flavor. I think I could go for more green onions next time though. Take-aways:
Stacey's Green Onion Hearty Country Bread Ingredients:
Sponge
1c whole wheat flour, organic
1/2c dark rye flour, organic
1/2 tsp yeast
1c water, 110F
Dough
3c unbleached white bread flour, organic artisan + 1/2-1c additional
1 tsp yeast
2 tsp salt
1 1/3c warm water, 110F
3 tbs honey (avocado honey - it's dark, thick and not very sweet or strong tasting. The boyfriend found this at a Mediterranean market)
5 green onions
Sunflower oil, organic
Hardware
Standing Mixer
Silicone spatula
Silicone brush
Plastic wrap
Parchment paper
Baking stone
Rimless baking sheet
First I made the sponge (mix all the ingredients together and cover with plastic wrap) and let it sit overnight. The next morning, I made the dough. I put the flour, yeast, and salt into my standing mixer and mixed the honey into the warm water. With the dough hook on the mixer, and on the stir setting, I poured the honey water in and allowed the dough to form. It was a fairly wet dough, but I like this better because otherwise the sponge won't mix in correctly.
I let the dough rest for 20 minutes, covered, after it was combined, and chopped the green onions into small pieces, discarding the tops and the bottom root portion. After the 20 minutes of resting and then added in the sponge and the green onions. I turned the mixer on with the dough hook and let it mix for 8 minutes, adding additional flour until the dough was just dry enough not to stick to my silicone spatula. It was still sticky to the touch, but just not sticky enough to instantly bond to the spatula.
Once it was complete, I poured a little bit of the oil on the dough (probably a tablespoon) and used a silicone brush to brush oil around the surface of the dough and the sides of the bowl. Then I used the silicone spatula to sort of turn the dough so that it would be separated from the bowl and get some oil over all of the dough's surface. I think you're supposed to make it into a ball by hand, but I'm lazy. :) Then I covered the top of the bowl with plastic wrap, not touching the dough, and then put it in the fridge overnight.
The following evening, I took the dough out, separated it into two pieces and formed loaves. I always press the dough into a flat rectangle, fold into the center like a business letter, then fold the opposite ends in and smash the edges together with my fingers to fix the ends. Then I turn it upside down so that the entire surface is round and smooth. I placed them on the parchment paper on the rimless baking sheet, brushed them with oil with the silicone brush, and left them to rise overnight.
In the morning, I set the oven to 500F with my baking stone in it, and then went to check on my 2 loaves in the refrigerator.
Lesson Learned: You'd think I'd know this after putting two loaves too close together in the oven in my last post. No, I did not. I put both loaves next to each other. So, from now on, I'll only put 1/2 of this recipe on each baking sheet (unless I'm baking a single loaf, of course).


One more reason that you shouldn't put all the dough on is that this much dough is pretty tough to wiggle on to the baking stone, especially if it's been rising in the fridge all night on the parchment paper (which gets the parchment paper pretty damp). I just barely got it in there. I try not to let too much heat out of the oven and open it for as short a time as possible, so anything that lengthens the process of getting the dough onto the stone is not so great.
I baked the loaves for about 30 minutes and I wish I could add smell to my posts. I love the smell of bread and green onion, so together it was just heavenly.
These loaves were big, and I've learned with big loaves, it's best to use both hands with 2 oven mitts to get them out of the oven.

I let them cool for another 30 minutes before slicing. I really like the texture of this bread. I think letting them rise in the refrigerator over a period of two days was well worth it.

The air pockets were the right size and the center was soft, moist, and had nice flavor. I think I could go for more green onions next time though. Take-aways:
- Refrigerator rising method is good.
- Adding salt to dry dough ingredients does not appear to have ill effects.
- Only half of the hearty country bread recipe on each baking sheet / piece of parchment paper.
- Next version of green onion bread - 10 green onion stalks.
Comments
Post a Comment